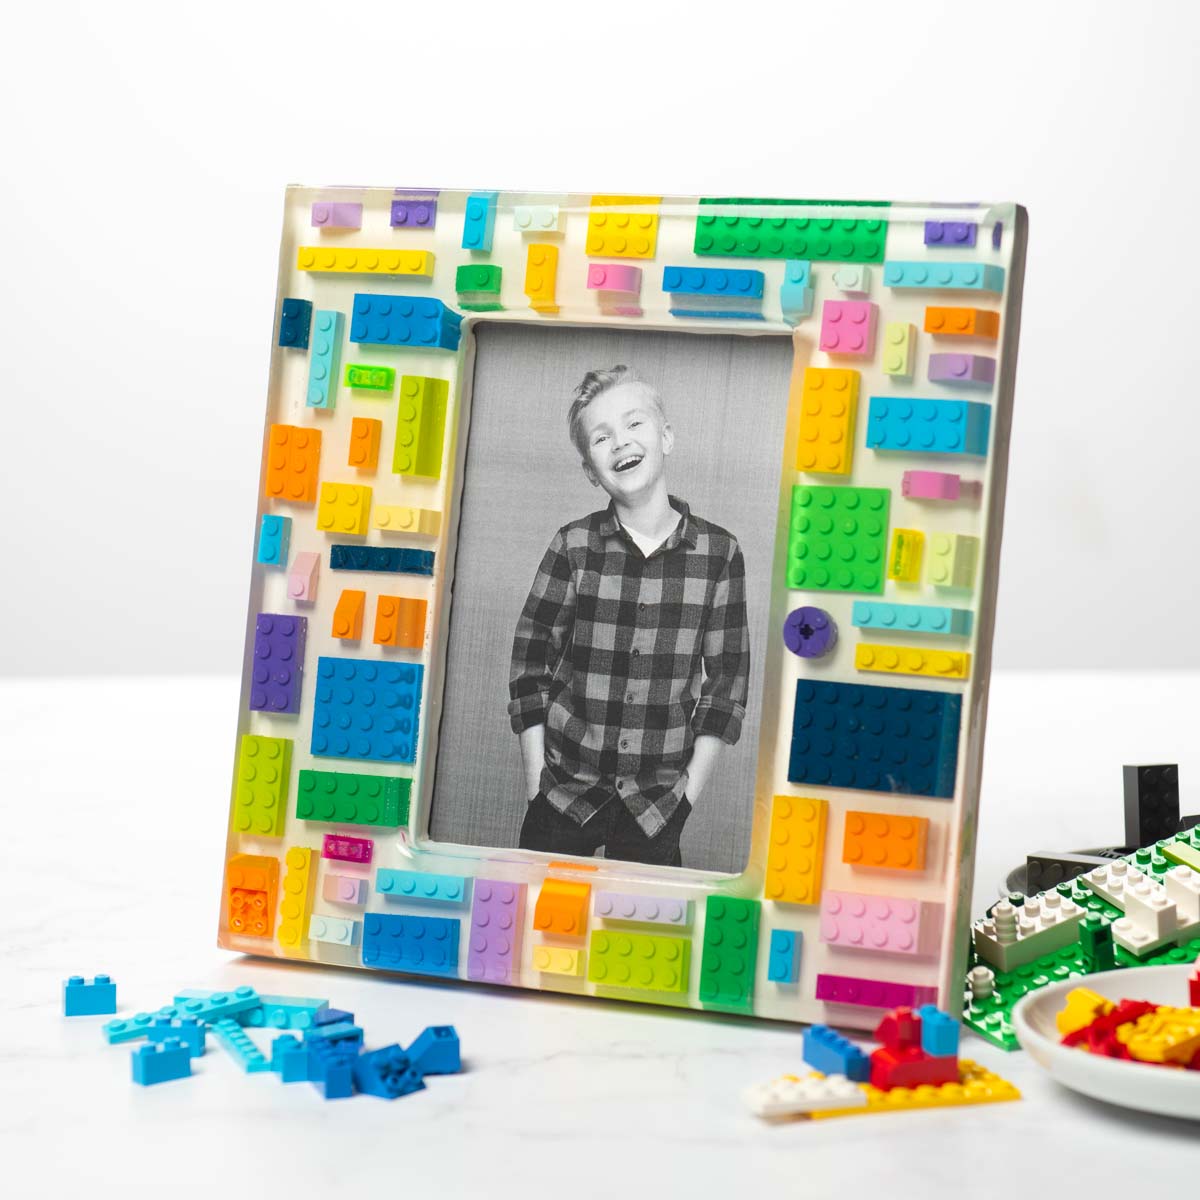
Find out how to create a resin frame utilizing epoxy and Legos! This resin photo frame is quite simple – what will you place in your masterpiece?
Required Skills: Intermediate. I suggest having some prior experience with resin so that you can effortlessly arrange the Legos and achieve the desired outcomes.
Initiating a DIY journey resembles wading into a pool of inventiveness and unexpectedness. And oh, have we been exploring some remarkable depths recently! By that, I refer to resin projects.
From the stunning patterns of ocean resin art to the shimmering charm of geode coasters, our expedition has been nothing less than enchanting.
We have even experimented with capturing the exquisite grace of dried flora encased within the lustrous grasp of resin, transforming them into everlasting jewelry pieces.
Now, as we delve deeper into this resin realm, I’m excited to introduce you to a fresh, thrilling venture: creating a DIY resin frame.
However, this isn’t just any frame—it’s a photo frame with a whimsical spin, where vibrant Legos appear to hover magically inside its edges.
Our upcoming creative pursuit includes embedding Legos into a resin photo frame, turning it into a one-of-a-kind piece that’s bound to attract admiration and ignite discussions.
Interestingly, there are TWO methods to create an epoxy resin frame. In both instances, you can embed items in the resin:
- Create it entirely from resin using a silicone mold like this one
- Utilize a wooden frame (or similar) as a foundation, tape the frame, and pour the resin on top
This photo frame employs the latter technique. The distinction between the two is that the first approach uses the mold exclusively, and the resin is poured and allowed to cure.
In the second approach, you’ll be required to tape around the frame to create a space for pouring. As mentioned, in both techniques, you may embed objects. The video included in this post illustrates the process.
Here’s a guide on how you’re going to construct a resin frame . . . it’s simpler than you might believe!
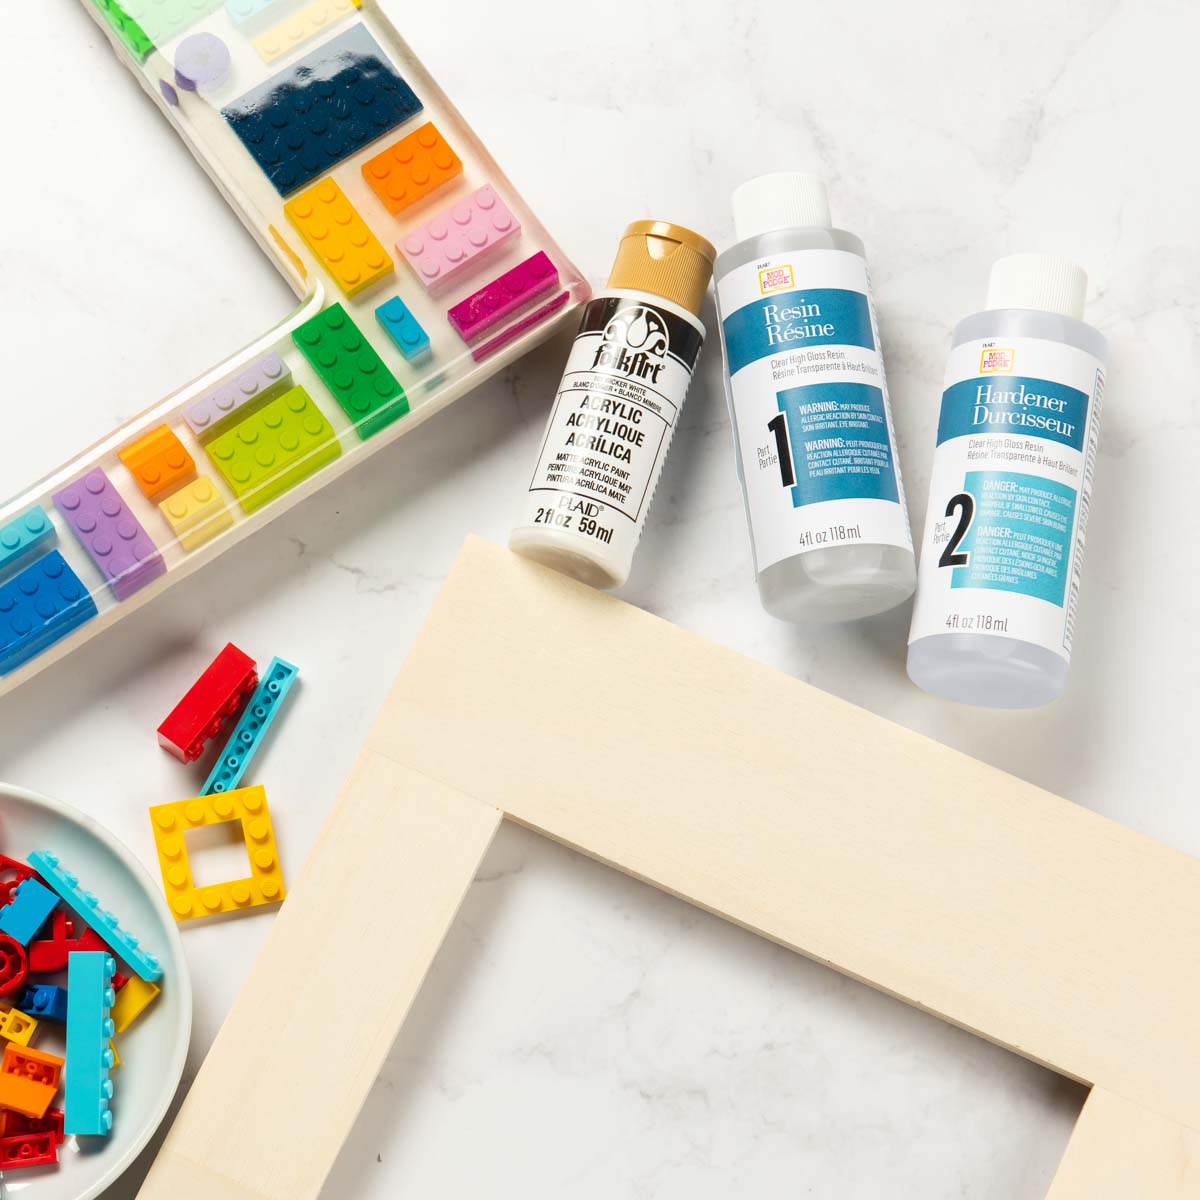
- Mod Podge Resin or similar
- Wooden frame
- Legos
- FolkArt paint – Wicker White
- Respirator
- Gloves
- Cups
- Craft sticks for mixing
- Torch
- Painter’s tape – 1 1/2”
- Sandpaper
- Paintbrushes
If you wish, you can sand and polish the resin frame following the guidelines here.
Obtain the printable guide for this project below:
DIY Resin Frame
Explore the craftsmanship of making
an exceptional frame utilizing Legos and epoxy resin! This results in entertaining home embellishment or a delightful gift notion.
Preparation Duration15 minutes mins
Active Duration1 hour hr 30 minutes mins
Drying Duration1 day d
Overall Duration1 day d 1 hour hr 45 minutes mins
Output: 1 frame
Expense: $10
-
Apply Wicker White paint to your frame and allow it to dry.
-
Adhere to the guidelines on the resin package for blending. Aim to combine 4 oz. of resin. Utilize a distinct measuring cup for each component. Once equal portions of both components are assessed, transfer them into a mixing cup. Gently mix the two components for 3 minutes. When stirring begins, cloudy swirls will emerge.
-
Affix the Legos to the frame, applying a small amount of resin on the base of each Lego for secure attachment. Allow to set for 20 minutes. Retain the remaining resin in the cup, as you have about 30 minutes of working time.
-
As the 20 minutes conclude, create a barrier around the frame using painter’s tape. Firmly press it around the frame as closely as possible to prevent any resin leakage.
-
Pour a layer of resin over the frame. Utilize a torch to eliminate any bubbles. Allow 24 hours for the resin to solidify.
-
Peel off the tape. Smooth the edges with sandpaper. Eliminate any dust. Cover the back of the frame to avert resin from spilling onto it.
-
Prepare the leftover resin, approximately 4 oz., based on the instructions followed previously. Pour resin over the entire frame again, allowing it to extend over the edges to cover the sides. Allow to set for several hours.
-
Detach tape from the back of the frame. Allow the resin to fully cure overnight.
While combining, ensure to scrape the sides and bottom of the mixing cup to thoroughly integrate the two parts. Continue mixing until the cloudy swirls disappear and the blend is transparent.
Did you enjoy discovering how to create this DIY resin frame? I would love for you to explore these additional resin project entries as well:
Cutting Board • DIY Coasters • Gold Leaf • Keychains • Preserve Flowers• Wood Slice Coasters