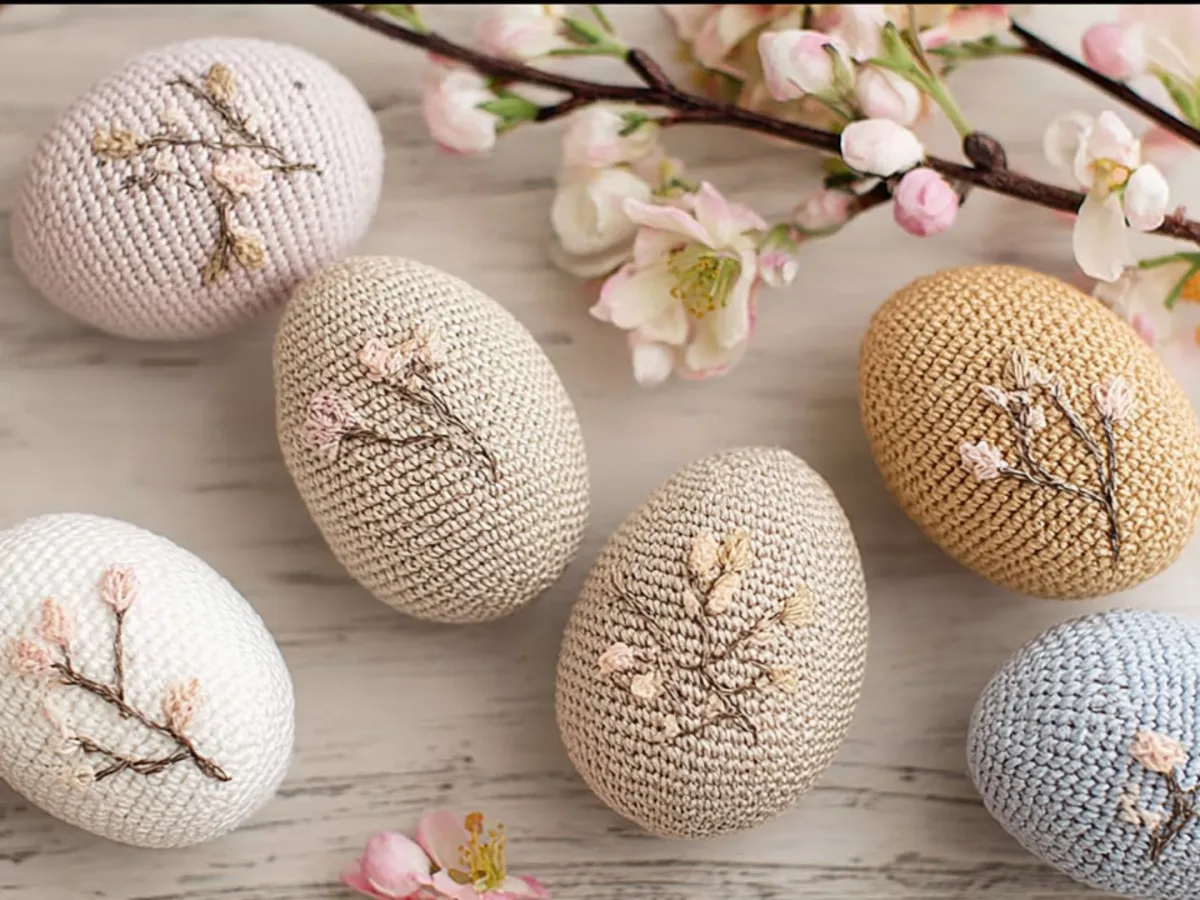
Are crafts your passion? Then merge a charming crochet endeavor with intricate embroidery! Decorating crocheted Easter eggs is not only enjoyable, it also creates a refreshing ambiance in your residence. With soft-hued yarn and finely stitched spring branches, you can produce unique embellishments that will be cherished annually. Additionally, you blend two crafting techniques and gain double the joy. Gather the supplies from our checklist and let’s craft wonderful Easter adornments together!
Contents: Embroidering crocheted Easter eggs
You require this for your crocheted Easter eggs
– Plastic eggs 🛒
– Pastel colored cotton or acrylic yarn 🛒
– Crochet hook of suitable size
– Darning needle with a large eye
Here’s how to crochet the eggs
To enable you to embellish your crocheted Easter eggs, initially create a smooth base in spiral rounds using single crochet stitches. Begin with a thread loop and work 6 single crochet stitches into it. Subsequently, gradually increase stitches evenly in the following rounds until the circle achieves the diameter of your egg. Next, crochet several rounds without increasing, ensuring the crochet piece hugs the blank tightly. Lastly, decrease stitches by crocheting two together until the opening closes – then neatly stitch the thread.
Required materials for the embroidered spring branch
The embroidery imparts your egg its unique personality. It’s advisable to use a darning needle and embroidery thread to easily navigate through the tight stitches.
Instructions in steps
1. Sketch or plan a branch
First, consider where you wish to position your branch. You can create a gentle curve from bottom to top, as this appears particularly natural. If desired, outline the route with a water-soluble pen.
2. Stitch a branch using a stem stitch
Now thread brown yarn and commence from the bottom. Utilize the stem stitch since it forms a delicate, slightly twisted line. Overlap each new stitch half on the preceding one to ensure the branch looks even. Be cautious not to pull the thread too taut, as this may distort the crochet.
3. Add buds or flowers
Now, introduce small details:
- For a Forsythia, stitch small yellow flowers with a few short straight stitches radiating in a star shape.
- For willow catkins, utilize light gray yarn and create small ovals with satin stitches placed close together.
- For green buds, place tiny French knots along the branch.
Combine various stitch types to bring your motif to life. You can also incorporate individual leaves using the Margeritenstich.
4. Fasten threads
Finally, gather all threads to the back and gently weave them between the stitches. Trim them just enough to ensure nothing protrudes.
Reading recommendations: Explore our guide on the 10 best embroidery techniques for novices here or discover how to embroider baskets adorned with flowers.
Crocheted Easter eggs as a spring centerpiece
If you aim to embroider crocheted Easter eggs, you unite crocheting and embroidery into a heartfelt DIY venture. First, you crochet your egg in soft shades, then you impart its personal touch with an embroidered spring branch. This results in timeless Easter decorations that you showcase each year – and perhaps even gift during Easter.