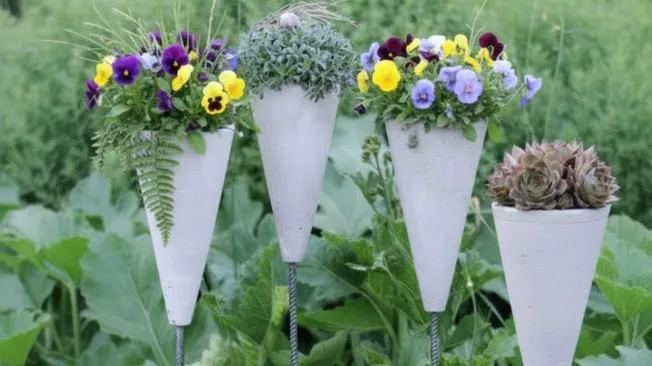
Ultimately, we can engage in garden activities or utilize the balcony once more, bask in the sunlight and appreciate the magnificent greenery! As a unique focal point, our DIY project creates quite a sensation: the concrete garden stakes appear stunning and provide your flowers and plants the platform they merit. In this article, we will demonstrate how you can effortlessly craft them yourself. Since decorations from the garden center can often be rather pricey, our concrete garden stakes offer the ideal solution. The ornamental plugs not only embellish your flower beds but are also easily crafted and affordable attractions on the balcony and terrace.
Decorative DIY to create yourself: concrete garden stakes
You don’t require a specialized workshop to create the garden stakes from concrete. A few simple pylons, some concrete, and a metal rod – that’s essentially all you need. The cone serves as the mold, and the concrete subsequently shapes a chic plant bowl. With the aid of the metal rod, you can position the stake anywhere in the flowerbed, in a pot, or as a pathway barrier. Succulents look especially attractive in the contemporary concrete plugs, but various flowers can also provide lovely touches.
In the following guidelines, we will outline step by step how you can fabricate concrete garden stakes from basic pylons and what details to consider. Have we captured your curiosity? Then let’s get started with the concrete!
Reading suggestions: Are you seeking more DIY concepts with concrete? Then take a look at how to make these elegant concrete eggs with gold edges, how you can create this concrete vase in Scandi style, and how to craft these candle holders from a Gugelhupf mold.
Concrete garden stake
Stefanie
- 2 Pylons approximately 24 cm tall, e.g. online here 🛒
- 1 Metal rod about 8 mm thick and 75 cm in length
- some cooking oil
- 750 g Creative concrete for instance, online here 🛒
- Stones for weighting down
- Small stones for the drainage layer
- some Potting soil
- Succulents
- Choose a pylon and, with a drill, create an 8 mm diameter hole at the top.
2 poles
- Position the poles with the opening facing upwards and insert the metal rod from beneath through the apex into the interior so that it extends about 6 cm into the cone.
1 metal rod
- Arrange two chairs with their backs together and “suspend” the prepared cone between them. The metal rod should safely rest on the ground. Check with a spirit level to ensure everything is aligned.
- Secure the poles to the backrests using some adhesive tape.
- Apply a small amount of oil to the interior of the cone.
some cooking oil
- Take another pole and apply oil to its exterior. This will facilitate the removal of both molds later on.
2 poles
-
Combine approximately 750 g of creative concrete with water as per the instructions on the packet until a thick, mushy consistency is achieved. Tip: Wear gloves when handling concrete.
750 g creative concrete
- Using the metal rod, fill the cone until it is about halfway full with the concrete.
- Now weigh down the second cone, which you previously oiled on the outside, with stones.
Stones
-
Press the weighted cone into the freshly poured concrete until it contacts the metal rod. Tip: Ensure that the cone is centered and that the edge maintains a similar thickness all around.
- Let the concrete cure for about two days.
- After it has dried, remove the stones from the inner cone.
- Gently squeeze the inner cone to facilitate its removal.
- To detach the outer cone, slightly bend the sides apart.
- Invert everything and pull the poles upwards over the metal rod.
- You can refine any edges and rough spots using sandpaper.
- To establish the concrete garden stake, include a layer of small stones in the concrete cone for drainage.
small stones
- Next, add some potting soil and succulents or other plants of your choice.
some potting soil, Succulents