Crocheting an egg holder might seem peculiar initially, but it’s a delightful, whimsical DIY project perfect for Easter and the spring season. Instead of genuine eggs, a tiny egg holder is crafted from yarn – complete with crocheted eggs in subtle pastel hues. This not only appears charming but also serves as a lovely ornament, a considerate present, or a small endeavor for anyone who enjoys amigurumi and seasonal crochet projects.
What’s especially endearing is that the crocheted egg holder resembles a fabric mini version of the original: with small depressions, a gentle edge, and coordinating eggs that fit perfectly inside. If you proceed with care and crochet firmly, the entire piece will maintain sufficient shape, ensuring the egg holder is clearly recognizable when completed.
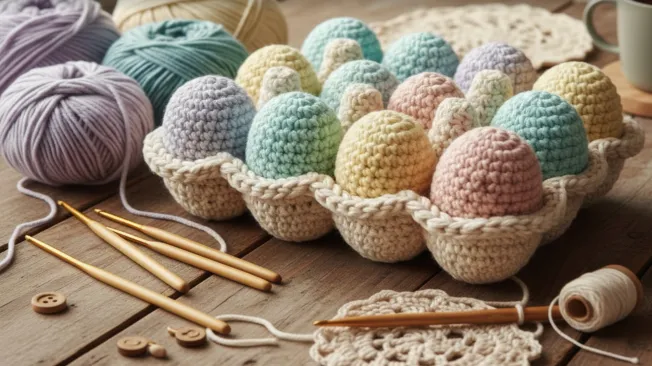
Crochet an egg holder: amusing Easter concept
When you decide to crochet an egg holder, it’s advisable to tackle it in two segments: initially the eggs, followed by the holder. The eggs are crocheted resembling small, slightly oval amigurumi forms and filled with fiberfill. The holder consists of a rectangular base featuring six compartments and a slightly elevated border so that the eggs rest neatly inside.
The primary focus is the yarn tension. Both the eggs and the egg holder look most appealing when crocheted snugly. This ensures that the shape appears tidy, the stuffing remains concealed, and the compartments retain their definition. The outcome is particularly attractive with pastel shades for the eggs and a natural tone for the holder itself.
Reading suggestions: If you wish to crochet further Easter adornments, consider creating your own crochet Easter eggs. In this guide, we will provide a step-by-step explanation on how to embellish them with lovely designs.
- Cotton yarn or crochet yarn in various colors e.g. B. from here 🛒
- fiberfill
- Slightly sturdier yarn for enhanced stability optional
- First, prepare your yarn for the eggs and the holder. A natural beige or cream hue appears especially lovely for the holder, while eggs in pastel yellow, mint, pink, lavender, or light blue instantly evoke a spring vibe.
Cotton yarn or crochet yarn in various colors
- Begin with the first egg. For this, crochet a small oval form in the round, akin to an amigurumi egg: commence small at the top, increase in the center, and slightly taper towards the bottom.
- Ensure you crochet tightly so that the egg appears nice and compact afterward. A dense structure always looks neater, particularly with small decorative shapes.
- Just before sealing, fill the egg with stuffing. The shape should be firm but not hard – more like a small soft Easter egg.
fiberfill
- Close the egg entirely and neatly sew the thread using the wool needle. It appears best if you crochet a total of six eggs in slightly varied pastel shades.
- Now it’s time to create the egg holder. Initially, crochet a rectangular base that is sufficiently large to accommodate six eggs in two rows. This base should be made slightly more durable than a standard crochet piece to prevent warping later on.
- Subsequently, keep working the edges to form a flat container. The rim doesn’t need to be excessively elevated, but sufficiently high so that the eggs can rest securely within it later.
- For the typical indentations of the egg carton, you should now indicate six evenly spaced spots on the base surface. There, you crochet or create small indentations by employing tight stitches and gently tugging in the area.
- Alternatively, you may crochet six small round indentations separately and attach them to the base. This approach is often more manageable if you desire the egg shapes to be distinctly defined.
- If you have crafted the indentations individually, affix them securely onto the rectangular base plate. Ensure that there is minimal space between the six troughs so that the egg carton appears to be made from a single entity.
- Next, crochet or tidy up the upper edge evenly all around once more. This provides the egg carton with a tidy finish and enhances its stability.
- If your crocheted egg carton still appears too soft, you can gently adjust it into the desired shape or use slightly firmer yarn. For mere decoration, a dense crochet pattern is typically sufficient to render it visually appealing.
Somewhat sturdier yarn for added stability
- Now place the completed eggs into the troughs and verify the fit. They should fit securely, but not submerge deeply—this is precisely when the small crocheted egg carton appears especially charming.
- Finally, sew all the leftover threads with care and arrange the eggs back in the box in an appealing color scheme. Pastel shades, in particular, look notably harmonious when bright and slightly bolder tones are combined.