Embroidery has gained considerable popularity recently. Besides traditional embroidered table linens, embroidered garments and accessories are especially in vogue. But have you ever come across the idea that you can also embellish baskets with floral designs? Instead of conventional embroidery thread, natural raffia is used to decorate seagrass baskets. Here, you can find a detailed explanation of how this is accomplished and how effortlessly you can turn ordinary baskets into cherished items!
Table of Contents: Decorating baskets with floral designs
Requirements
Embroidering baskets with floral motifs: Here’s how
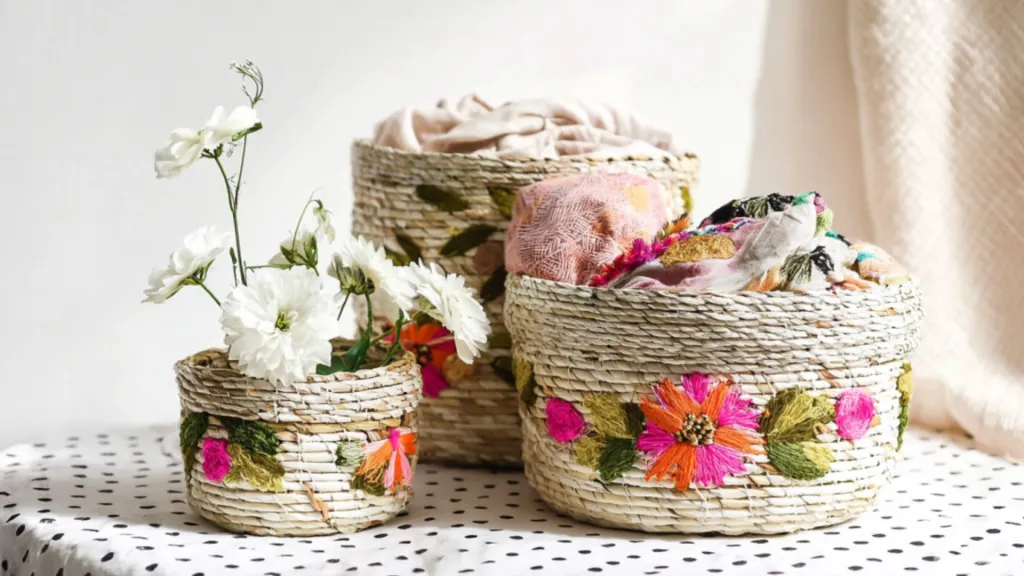
With our guidelines, you can effortlessly embroider baskets decorated with floral designs. Credit: Midjourney: This image was generated using AI technology.
No special prior knowledge of embroidery is required for this DIY project. Everything can be executed using straightforward stitches – almost resembling painting on the basket with natural raffia.
1. Plan the design
When you explore online, you’ll find an assortment of embroidery designs. The selection ranges from basic flowers to intricate animals and entire scenes. When creating floral decorations on baskets with natural raffia, it’s advisable to stick to simple patterns.
For beginners, starting with tiny dots is recommended. To do this, thread the natural raffia through the needle and pierce through the side of the basket from the interior to the exterior. Dots can be stitched crosswise, providing a good feel for the material and technique. If you wish to dive into flowers at once, sketching the design with a pencil is a great approach.
Additional reading: Are you seeking more embroidery inspiration? Then check out how to embellish a bag with beads and how to embroider with hot glue.
2. Embellish baskets with florals
Flowers are especially attractive on the baskets. Begin with the flower’s center, embroidering crosswise like the previous dots until a small circle forms. Next, develop the petals. For this, pierce the basket with another color close to the flower’s center, and then reinsert the needle into the inside of the basket about a centimeter away. Shape the petals by adding stitches to the left and right of the last stitch made, each successively shorter. This method creates the typical petal shape. Surround the flower’s center with a total of five petals.
After completing the initial five petals, take a second color and stitch five additional petals in between. This adds depth and a delightful color effect.
3. Expand the floral arrangement
Embroider extra flowers, small branches, and leaves around the initial flower. There’s no need for complex stitches here either – simple lines or circles will suffice. Let your imagination flow and experiment with various colors. You can sew and tie off the threads on the inside afterward.
Tip: If you feel confident, you might also embroider short names onto the baskets. For this, sketch the letters in pencil and use a simple backstitch to embroider them.
Gift idea from the heart
Your embroidered baskets make fantastic gifts for birthdays, Valentine’s Day, Mother’s Day, or simply for no particular reason. To prepare, place a tissue paper sheet at the bottom of the basket and fill it with small presents. The baskets can then serve as decoration or storage, for instance, for crafting materials. Decorating baskets with floral designs is a creative DIY project that infuses personality, color, and spring essence into any space. Give it a try! We hope you enjoy the process of crafting it.
Learn how to make wood Christmas crafts that you can use for holiday decorating, gifting, or even to sell! Get over 45 EASY and unique ideas. Skills R [...]
Discover how to stitch a yarn tote with this straightforward guide and craft a bag that keeps your yarn, needles, and projects meticulously arranged. [...]
Children will adore crafting these DIY suncatchers utilizing tissue paper and repurposed plastic lids! A delightful, eco-friendly activity that’s vibr [...]
Create DIY baggage tags utilizing Mod Podge, cardboard, and textile! A delightful, simple method to customize your suitcase and recognize it quickly. [...]
Learn how to make this “Merry” Christmas decor using paper mache letters, a wood plaque, and other fun holiday supplies! Such a cute idea. Skills Requ [...]
This article and pictures might incorporate Amazon or other affiliate links. Should you buy something through any link, I could receive a nominal comm [...]
We use cookies on our website to give you the most relevant experience by remembering your preferences and repeat visits. By clicking “Accept”, you consent to the use of ALL the cookies.
This website uses cookies to improve your experience while you navigate through the website. Out of these, the cookies that are categorized as necessary are stored on your browser as they are essential for the working of basic functionalities of the website. We also use third-party cookies that help us analyze and understand how you use this website. These cookies will be stored in your browser only with your consent. You also have the option to opt-out of these cookies. But opting out of some of these cookies may affect your browsing experience.
Necessary cookies are absolutely essential for the website to function properly. These cookies ensure basic functionalities and security features of the website, anonymously.
Cookie
Duration
Description
cookielawinfo-checbox-analytics
11 months
This cookie is set by GDPR Cookie Consent plugin. The cookie is used to store the user consent for the cookies in the category "Analytics".
cookielawinfo-checbox-functional
11 months
The cookie is set by GDPR cookie consent to record the user consent for the cookies in the category "Functional".
cookielawinfo-checbox-others
11 months
This cookie is set by GDPR Cookie Consent plugin. The cookie is used to store the user consent for the cookies in the category "Other.
cookielawinfo-checkbox-necessary
11 months
This cookie is set by GDPR Cookie Consent plugin. The cookies is used to store the user consent for the cookies in the category "Necessary".
cookielawinfo-checkbox-performance
11 months
This cookie is set by GDPR Cookie Consent plugin. The cookie is used to store the user consent for the cookies in the category "Performance".
viewed_cookie_policy
11 months
The cookie is set by the GDPR Cookie Consent plugin and is used to store whether or not user has consented to the use of cookies. It does not store any personal data.
Functional cookies help to perform certain functionalities like sharing the content of the website on social media platforms, collect feedbacks, and other third-party features.
Performance cookies are used to understand and analyze the key performance indexes of the website which helps in delivering a better user experience for the visitors.
Analytical cookies are used to understand how visitors interact with the website. These cookies help provide information on metrics the number of visitors, bounce rate, traffic source, etc.
Advertisement cookies are used to provide visitors with relevant ads and marketing campaigns. These cookies track visitors across websites and collect information to provide customized ads.