Are you also experiencing an embroidery craze? Then we have something special for you! Stitching floral letters is currently popular as it merges hand lettering with intricate embroidery. At the same moment, you craft a bespoke gift or a charming design accent for your home. Whether as a newborn gift, a monogram for your closest companion, or a striking feature within a picture frame—if you desire to stitch floral letters, all you require is a touch of patience, vibrant threads, and a flair for creativity. So pick up your embroidery tools and let’s dive in!
Table of Contents: Stitching floral letters
You will need
If desired, you can also incorporate pearl thread, metallic thread, or tiny beads to add even more dimension to your work.
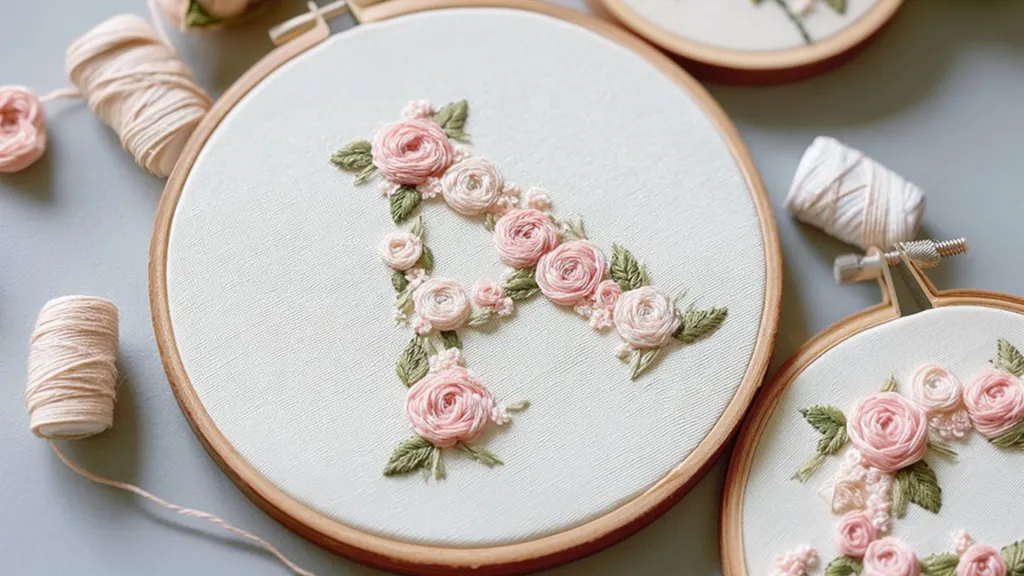
A floral letter in an embroidery hoop is always a delightful and personal gift. Credit: Midjourney: This image was generated with the assistance of AI.
Step-by-step guide
1. Prepare template and outline letters
Initially, select a letter. Sketch it on paper and experiment with its shape. Determine if you favor straight or curved letters, then cut out the letter you have drawn.
Next, stretch the fabric tightly in the embroidery frame. Afterwards, transfer the letter onto the fabric using a water-soluble pen. Ensure you draw distinct lines, as this will assist you in staying oriented while stitching.
2. Arrange flowers within the letter
Now, the imaginative aspect of stitching floral letters commences. Pick a second color and loosely sketch small flowers into the letter’s shape. Distribute them unevenly since symmetry can quickly become monotonous. Position larger flowers in one area and add smaller buds or simple dots alongside.
Additionally, plan to incorporate various types of flowers: simple five-petal daisies, small spiral roses, or mini French knot blooms. This adds depth, making your letter resemble a flourishing meadow.
3. Optional: stitch outlines
Should you wish to outline your floral letter, begin by stitching the outer line of the letter first. The backstitch is particularly suitable for this purpose, as it creates a neat and continuous line. Proceed slowly and evenly to maintain clear visibility of the shape.
If you prefer, you may embroider the outline in a neutral hue to highlight the vibrant flowers more. Alternatively, choose a bold color to ensure the letter immediately captures attention.
4. Develop flowers and add details
If you are working without an outer outline, utilize the external line of your letter as a guide, which will wash out later. Bring the pre-drawn flowers to life. Stitch the petals with the satin stitch or daisy stitch. For small buds, use French knots for added texture.
Alternate between colors and stitch types to create a diverse look for your project. You can also incorporate small leaves or tendrils that extend just beyond the letter’s edge. It is precisely these small “protrusions” that infuse your motif with dynamism.
5. Completion and washing out
Finally, review your work and add additional mini flowers or dots if necessary. Then gently wash the fabric to ensure the lines of the water-soluble pen disappear. Allow everything to dry completely, and then straighten the fabric again.
Reading suggestions: Discover how to embroider a charming chamomile flower here, or even stitch delightful snowdrops.
Creative gift idea with character
When you attempt floral letter embroidery, you will create personalized masterpieces with significant meaning. The interplay of large and small flowers, along with their uneven distribution, ensures that each design appears one-of-a-kind. Simultaneously, you can mix colors, stitches, and sizes repeatedly. This versatility is precisely why it remains a timeless DIY trend that captivates both novices and seasoned artisans.
Kids can craft their own simple holiday paper chain countdown using this guide! This children's advent calendar is created from construction paper, de [...]
Macrame is an age-old knotting method that has become fashionable once more in recent times. It’s ideal for crafting ornamental items that not only ap [...]
This article and pictures might incorporate Amazon or other affiliate links. Should you buy something through any link, I could receive a nominal comm [...]
Transform an ordinary clipboard with textile, paint, and Mod Podge! A delightful and straightforward craft to customize your office or educational sup [...]
These photographic gift suggestions and DIY initiatives make it easy to transform photos into meaningful presents for relatives, companions, and unfor [...]
A navy blue residence possesses a striking, timeless sophistication, yet selecting the appropriate flowers to enhance it can be unexpectedly challengi [...]
Print this simple spring word search for a swift, screen-free endeavor that's ideal for dreary days, road trips, or quiet periods in classrooms. Sprin [...]
Crafting an exquisite perennial flower bed arrangement doesn’t have to be daunting—or pricey. The key to a remarkable, impactful garden lies not just [...]
We use cookies on our website to give you the most relevant experience by remembering your preferences and repeat visits. By clicking “Accept”, you consent to the use of ALL the cookies.
This website uses cookies to improve your experience while you navigate through the website. Out of these, the cookies that are categorized as necessary are stored on your browser as they are essential for the working of basic functionalities of the website. We also use third-party cookies that help us analyze and understand how you use this website. These cookies will be stored in your browser only with your consent. You also have the option to opt-out of these cookies. But opting out of some of these cookies may affect your browsing experience.
Necessary cookies are absolutely essential for the website to function properly. These cookies ensure basic functionalities and security features of the website, anonymously.
Cookie
Duration
Description
cookielawinfo-checbox-analytics
11 months
This cookie is set by GDPR Cookie Consent plugin. The cookie is used to store the user consent for the cookies in the category "Analytics".
cookielawinfo-checbox-functional
11 months
The cookie is set by GDPR cookie consent to record the user consent for the cookies in the category "Functional".
cookielawinfo-checbox-others
11 months
This cookie is set by GDPR Cookie Consent plugin. The cookie is used to store the user consent for the cookies in the category "Other.
cookielawinfo-checkbox-necessary
11 months
This cookie is set by GDPR Cookie Consent plugin. The cookies is used to store the user consent for the cookies in the category "Necessary".
cookielawinfo-checkbox-performance
11 months
This cookie is set by GDPR Cookie Consent plugin. The cookie is used to store the user consent for the cookies in the category "Performance".
viewed_cookie_policy
11 months
The cookie is set by the GDPR Cookie Consent plugin and is used to store whether or not user has consented to the use of cookies. It does not store any personal data.
Functional cookies help to perform certain functionalities like sharing the content of the website on social media platforms, collect feedbacks, and other third-party features.
Performance cookies are used to understand and analyze the key performance indexes of the website which helps in delivering a better user experience for the visitors.
Analytical cookies are used to understand how visitors interact with the website. These cookies help provide information on metrics the number of visitors, bounce rate, traffic source, etc.
Advertisement cookies are used to provide visitors with relevant ads and marketing campaigns. These cookies track visitors across websites and collect information to provide customized ads.