Unused jars are far too splendid for the glass vessel! With some tracing paper and imagination, you can effortlessly create enchanting lanterns from jam jars, illuminating your balcony with a cozy glow. Discover how to achieve this and what materials you’ll need for the speedy craft below!
Lanterns crafted from jam jars: inventive upcycling for the balcony
The days are noticeably shortening again, yet summer is by no means over! Pleasant evenings on the balcony become truly inviting with homemade lanterns fashioned from empty jam jars that dispel the encroaching darkness with their serene radiance. The best part: You need not be a skilled artisan to excel at this quick upcycling project, and even young children can relish the joy of creative crafting.
Here’s what you need for the lanterns from jam jars
Step-by-step guide for a charming lantern
1. Prepare jars
After you have scraped out the last remnants of jam from the jar, you should thoroughly rinse it. To eliminate the label, immerse the jar in warm water and add a bit of dish soap. After a short period, the label can be easily peeled off.
Reading tips: The label won’t budge? Here’s how you can effortlessly remove stickers and labels.
2. Create scraps of tracing paper
Cut out colorful fragments – either in geometric shapes (circles, squares, triangles, stripes) or tear the tracing paper into random shreds. The lantern made from a jam jar appears particularly delightful if you blend different colored tracing papers.
Extra tip: If you have an old Confetti cannon 🛒 stashed away, you can simply utilize the fragments from it. This way, you spare yourself the trouble of cutting it to size.
3. Combine craft glue
Grab a small bowl and mix equal amounts of water and craft glue. By the way, you aren’t required to use transparent craft glue. The white adhesive becomes clear once it dries.
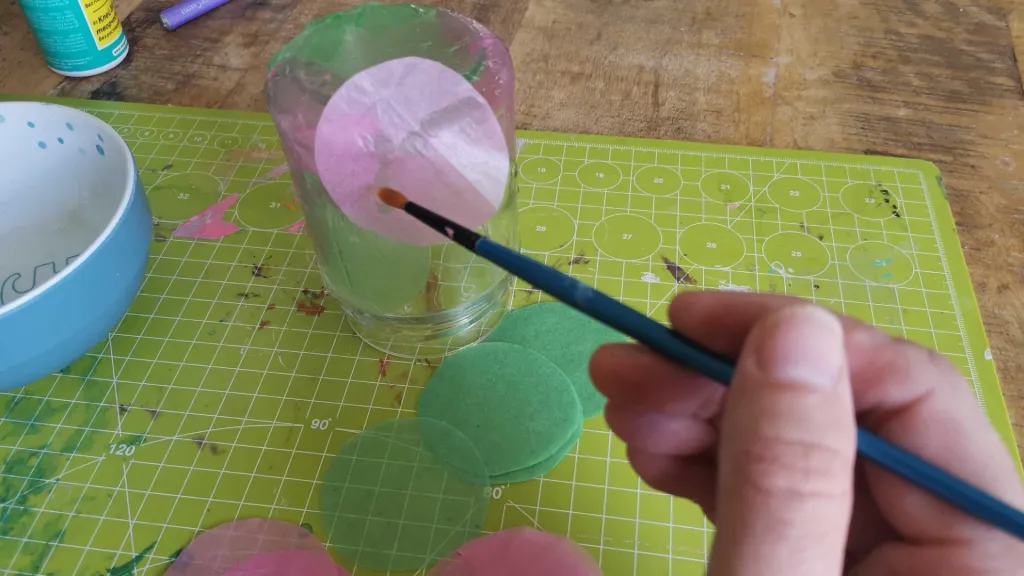
4. Now it’s time to glue!
Now attach the individual pieces of tracing paper onto the jam jar. Credit: FUNKE Digital
Use the brush to apply a light coat of the glue-water mixture onto the glass and position a piece of tracing paper on top. Proceed to cover the entirety of the exterior of the glass. Overlaps create beautiful color fusions. Subsequently, seal everything again with another thin layer of glue and water. Now you must be patient and allow the glass to dry thoroughly.
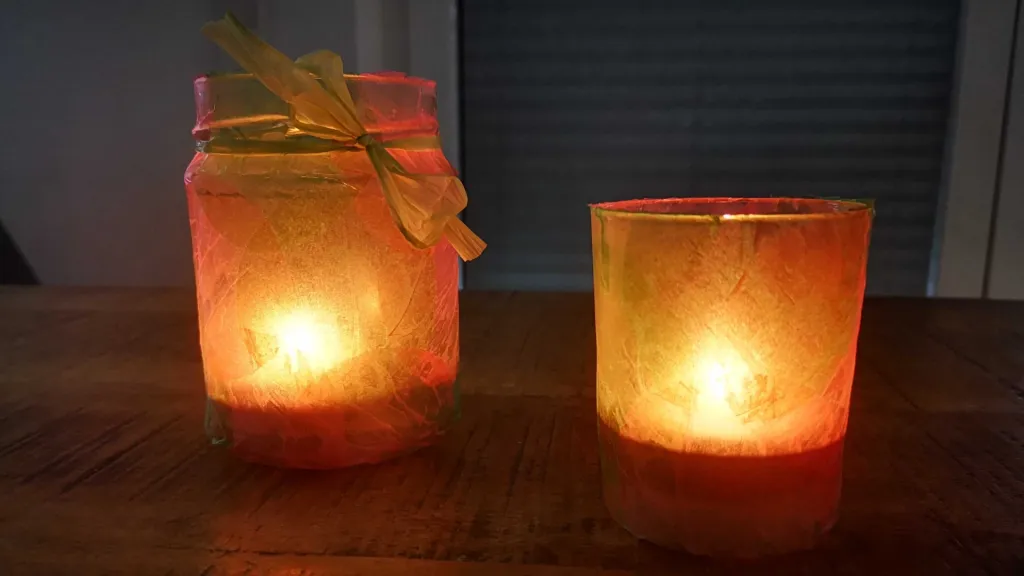
5. Insert candle
When the glue has set, you can place a tea light inside your vibrant jam jar and relish the interplay of colors of your handmade lantern!
If you desire something more sophisticated, you can simply cover the glass with a layer of tracing paper into which you’ve previously cut small designs. The light will shine through the gaps later. Opt for tracing paper in a bold hue for a more striking effect.
If preferred, wrap some wire around the rim of the glass so you can suspend your crafted lantern.
Create appropriate lanterns based on the season: utilize orange-red papers for autumn, snowflake patterns for winter, or pastel shades for spring.
Reading tips: Create your own light curtain for the balcony – from repurposed jars
Each lantern is one-of-a-kind! Credit: FUNKE Digital
With this inventive upcycling, the jars that would otherwise occupy space in the cupboard transform into true eye-catching pieces on your balcony. The finest part: Every lantern is distinctive – handmade, eco-friendly, and guaranteed to impress when lit. Enjoy crafting!
Kids can craft their own simple holiday paper chain countdown using this guide! This children's advent calendar is created from construction paper, de [...]
Craft a DIY quilt for baby dolls utilizing this straightforward ruffled guide that produces comfortable, personalized bedding that children will adore [...]
Who doesn’t desire a collection of charming DIY customized pencils to commence a new academic year? These also serve as wonderful presents – and are s [...]
Apply the Vinyl Decal Prior to applying the decal, ensure the surface is thoroughly cleaned. I prefer utilizing a bit of isopropyl alcohol as it elimi [...]
These photographic gift suggestions and DIY initiatives make it easy to transform photos into meaningful presents for relatives, companions, and unfor [...]
We use cookies on our website to give you the most relevant experience by remembering your preferences and repeat visits. By clicking “Accept”, you consent to the use of ALL the cookies.
This website uses cookies to improve your experience while you navigate through the website. Out of these, the cookies that are categorized as necessary are stored on your browser as they are essential for the working of basic functionalities of the website. We also use third-party cookies that help us analyze and understand how you use this website. These cookies will be stored in your browser only with your consent. You also have the option to opt-out of these cookies. But opting out of some of these cookies may affect your browsing experience.
Necessary cookies are absolutely essential for the website to function properly. These cookies ensure basic functionalities and security features of the website, anonymously.
Cookie
Duration
Description
cookielawinfo-checbox-analytics
11 months
This cookie is set by GDPR Cookie Consent plugin. The cookie is used to store the user consent for the cookies in the category "Analytics".
cookielawinfo-checbox-functional
11 months
The cookie is set by GDPR cookie consent to record the user consent for the cookies in the category "Functional".
cookielawinfo-checbox-others
11 months
This cookie is set by GDPR Cookie Consent plugin. The cookie is used to store the user consent for the cookies in the category "Other.
cookielawinfo-checkbox-necessary
11 months
This cookie is set by GDPR Cookie Consent plugin. The cookies is used to store the user consent for the cookies in the category "Necessary".
cookielawinfo-checkbox-performance
11 months
This cookie is set by GDPR Cookie Consent plugin. The cookie is used to store the user consent for the cookies in the category "Performance".
viewed_cookie_policy
11 months
The cookie is set by the GDPR Cookie Consent plugin and is used to store whether or not user has consented to the use of cookies. It does not store any personal data.
Functional cookies help to perform certain functionalities like sharing the content of the website on social media platforms, collect feedbacks, and other third-party features.
Performance cookies are used to understand and analyze the key performance indexes of the website which helps in delivering a better user experience for the visitors.
Analytical cookies are used to understand how visitors interact with the website. These cookies help provide information on metrics the number of visitors, bounce rate, traffic source, etc.
Advertisement cookies are used to provide visitors with relevant ads and marketing campaigns. These cookies track visitors across websites and collect information to provide customized ads.