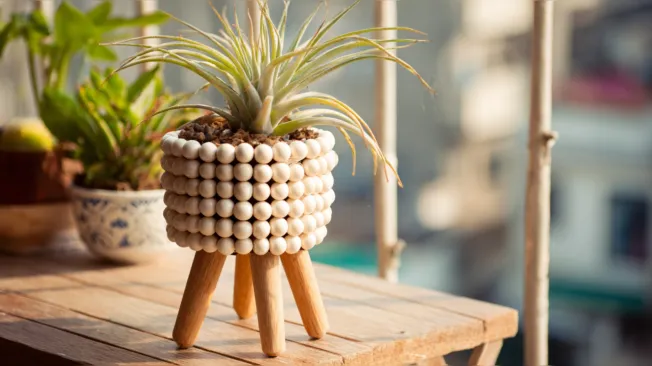
Wooden spheres are a resource that you instantly recognize: you can craft something stunning with them. Their spherical, sleek form exudes a natural warmth that very few other materials express so effortlessly. A planter crafted from wooden spheres is therefore more than merely an attractive ornament: it is genuinely one-of-a-kind and brings a distinctive flair to any residence.
Planter crafted from wooden spheres
The amazing aspect of this endeavor is that the planter can be effortlessly customized to your personal style. The spheres can be painted or coated as preferred, for instance in subtle earthy shades, vibrant hues, or a natural wood appearance. The legs fashioned from circular wood are just one of many possibilities. If desired, you can opt for small metal feet, felt pads, or cork rounds instead and effortlessly achieve an alternative aesthetic.
The best part: You don’t require any specialized prior expertise or costly tools for this DIY project. It is appropriate for everyone – from crafting novices to artistic experts. We will now guide you step by step on how to assemble your own planter. Let’s dive in!
If you appreciate the organic appearance, you should certainly consider trying these braided wrapping paper pots. Natural elements such as twigs are also fantastic for enhancing plain planters. For a contemporary and tidy appearance, we suggest this stone-finish planter.
Planter crafted from wooden spheres
Claudia
- Wooden spheres without openings e.g. here 🛒
- Outdoor wood protection varnish, exterior glaze or marine varnish to safeguard the wooden spheres from humidity and UV rays
- Transparent varnish or exterior finish for sealing the planter
- 4 Pieces of round wood e.g. here 🛒
- Work surface
- 1 planter made of weather-resistant material (e.g. plastic or galvanized metal)
- Weather-resistant assembly adhesive (clear)
- 1 paintbrush for applying varnish and glaze
- First, prepare your planter and have all the materials readily available. Ensure that the surface is clean and dry to allow the adhesive to adhere effectively.
- Do you want to place your flower pot outside later? Then treat the wooden spheres with wood protection lacquer, exterior gloss, or marine varnish prior to affixing them and allow them to dry thoroughly. This ensures that the gaps between the spheres are well safeguarded later.
wooden spheres without drilling, weatherproof wood protection lacquer, exterior gloss, or marine varnish
- Apply the weather-resistant assembly adhesive to the first wooden sphere and attach it near the pot. Hold the sphere briefly until the adhesive sets.
- Affix the remaining spheres directly adjacent to each other until the entire bottom layer is completely enclosed.
- Adhere the subsequent row of spheres shifted from the first row – similar to constructing walls. This creates an attractive, even design and stabilizes the spheres.
- Proceed row by row, always staggered, until the entire pot is enveloped with spheres. Allow to dry briefly if needed.
- Finally, affix the four pieces of round wood evenly spaced at the bottom of the pot. They function as stylish feet and provide the pot with a great foundation.
4 pieces of round wood
- Once the adhesive has completely dried, apply a final coat of wood or marine varnish over the entire surface, including the gaps between the spheres.
Transparent varnish or exterior lacquer
- Also seal the pot itself with a weatherproof exterior coating.
- Allow everything to dry completely and then admire your completed creation – your very own, handcrafted flower pot made from wooden spheres!
Now create
There are virtually no limits to your creativity when designing your flower pot. The wooden spheres can be delightfully painted with acrylic paint or treated with wood stain in various shades prior to affixing them – making the pot perfectly match your personal decor style. If you prefer a natural look, simply retain the spheres in their original wooden appearance and enhance the grain with a clear varnish. A combination of painted and unpainted spheres can also result in a stunning effect. It’s also beneficial to get inventive with the feet: small industrial-style metal legs, decorative wooden rounds, or simple felt pads are just a few of the possibilities to give the pot your unique touch.